Most first-time shed builders get tripped up not by the building itself, but by the plans. Either the plans lack a cut list, forcing guesswork at the lumber yard, or the shed ends up 40 square feet too small to fit a riding mower.
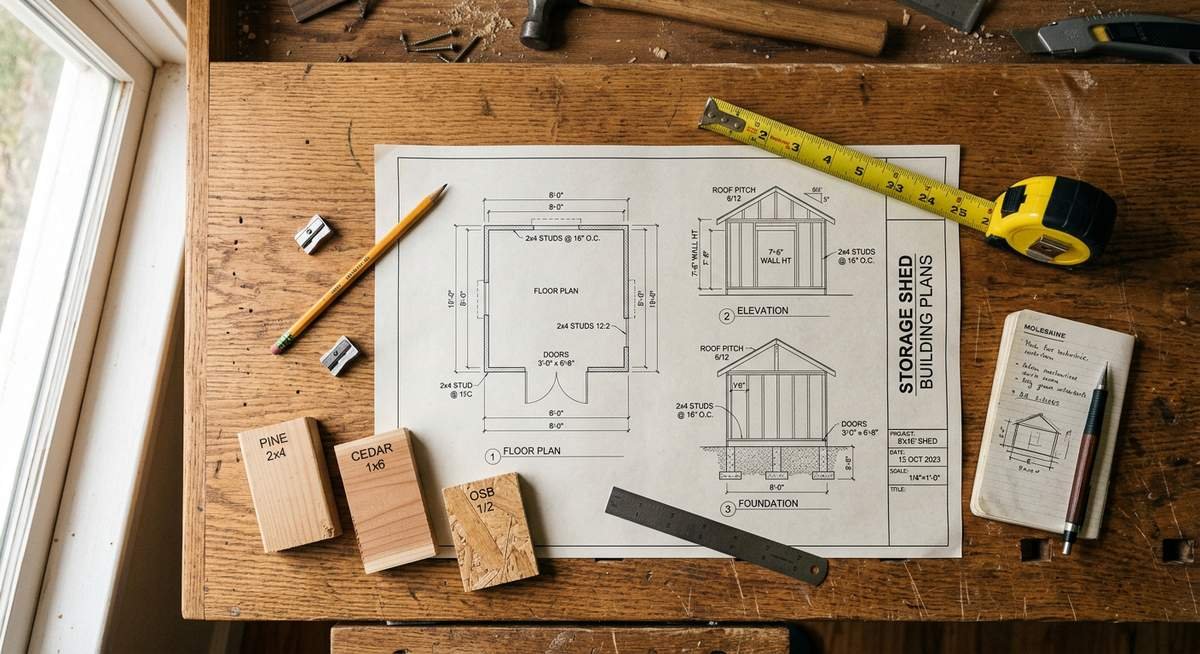
Good storage shed building plans include a materials list with exact quantities, a cut list with board-by-board dimensions, a foundation specification, wall framing diagrams, roof framing details, and a door and window schedule. Get a set of plans with all six components, and the actual construction becomes a manageable sequence of tasks. Miss a few, and you’ll be making expensive decisions on a ladder.
What a Complete Set of Storage Shed Building Plans Should Include
A complete set of storage shed building plans has six components: a materials list with quantities, a cut list with exact board dimensions, a foundation plan, wall framing diagrams, roof framing details, and a door and window schedule. Plans that omit any of these leave you making engineering decisions mid-build, which is where most cost overruns and structural mistakes originate.
Here is what each component actually contains and why it matters:
| Plan Component | What It Contains | Why It Matters |
|---|---|---|
| Materials List | Every item with quantity (lumber by linear feet, hardware by count, roofing by square feet) | Lets you price the build before buying anything; prevents three trips to the lumber yard |
| Cut List | Each board’s final dimension (e.g., 2×4 @ 92.5″) | Saves hours of measuring; enables batch cutting for speed and accuracy |
| Foundation Plan | Pier layout, skid spacing, or slab dimensions with load specs | Determines permit status in many jurisdictions; affects long-term stability |
| Wall Framing Diagrams | Stud spacing, header sizes, rough opening dimensions | Ensures structural integrity; required for permit submission in many counties |
| Roof Framing Details | Rafter length, ridge board spec, pitch, overhang distance | Incorrect pitch on a shed in a snowy climate is the most common structural failure point |
| Door and Window Schedule | Rough opening size, swing direction, hardware specs | Doors ordered wrong-size cost $200-$400 to return; a schedule prevents this entirely |
A cut list alone saves an entire day of measuring at the lumber yard. That single sheet of paper, if accurate, is worth more than any other part of the plan package. Builders who get this right batch-cut all studs in an hour; builders who don’t spend two days making trips back to the store for boards they miscounted. For context on what qualifies as a shed versus other accessory structures, Wikipedia’s overview of sheds outlines the common structural categories recognized in the US and UK.
Storage Shed Size Guide: Choosing the Right Footprint
For lawn tools and a push mower, an 8×10 shed fits comfortably. A 10×12 handles a riding mower. A 12×16 adds room for a workbench alongside equipment storage. Going one size smaller than your current needs means you’ll be cramming gear in within two years; every experienced shed builder recommends sizing up by one increment from your initial estimate.
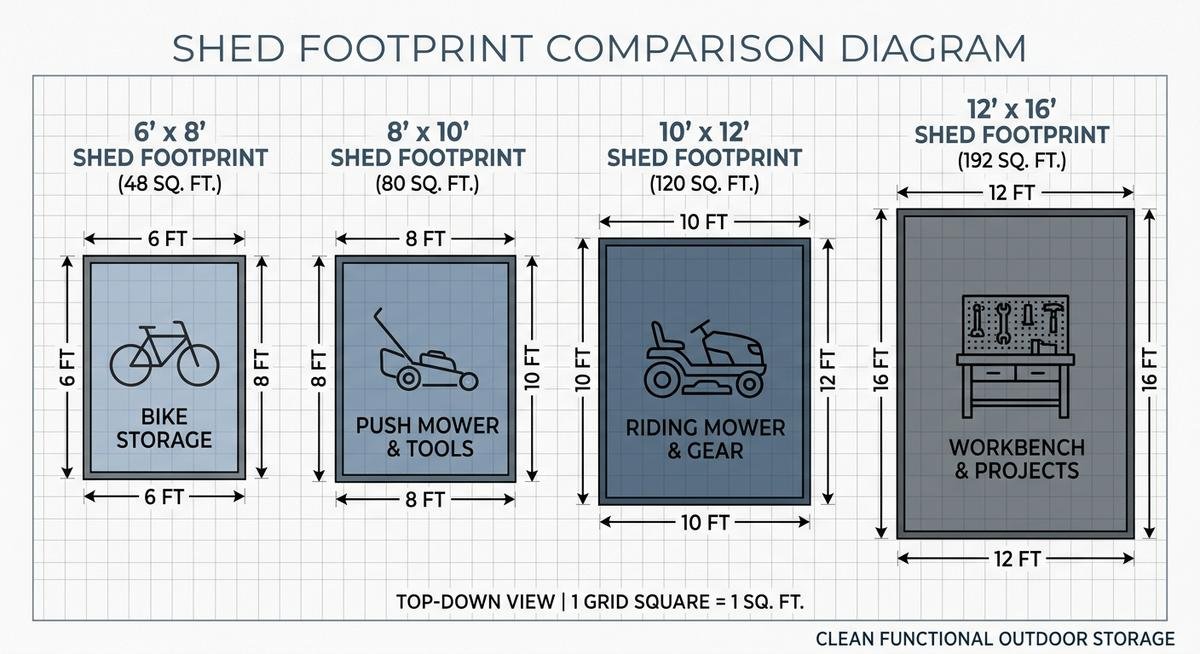
| Shed Size | Sq Footage | Best For | Est. Build Cost (2025) |
|---|---|---|---|
| 6×8 | 48 sq ft | Bike storage, garden hand tools, small equipment | $600 – $900 |
| 8×10 | 80 sq ft | Push mower, tools, seasonal items | $1,200 – $1,800 |
| 10×12 | 120 sq ft | Riding mower, two-zone storage layout | $2,000 – $3,000 |
| 12×16 | 192 sq ft | Workshop plus storage, multiple large tools | $3,500 – $5,500 |
| 16×20 | 320 sq ft | Small garage alternative, full workshop | $6,000 – $10,000 |
Cost estimates above reflect framing lumber, roofing, siding, hardware, and foundation materials as of 2025. Labor is excluded; a two-person crew on a weekend build typically completes an 8×10 to 10×12 in one to two weekends depending on foundation type.
What looks like a quick weekend project on paper often becomes a permanent fixture that serves the property for twenty or thirty years. Sizing correctly from the start is the single decision that matters most before any plan gets ordered.
The 4 Main Shed Roof Styles and When to Use Each
The gable roof handles snow loads best and suits most US climates. Lean-to roofs cost less in materials and install against an existing wall or fence. Gambrel roofs maximize loft storage. Hip roofs offer the best wind resistance for coastal and high-wind zones. Roof style affects material quantity significantly: switching from a lean-to to a gable on a 10×12 adds roughly $200-$350 in lumber and underlayment.
| Roof Style | Build Complexity | Snow Load | Wind Resistance | Best Climate |
|---|---|---|---|---|
| Gable | Low-Medium | Excellent | Good | Most US regions; especially cold-climate zones |
| Lean-to (single slope) | Low | Poor-Fair | Good (if anchored) | Mild climates; tight spaces against a wall or fence |
| Gambrel (barn-style) | Medium-High | Good | Fair | Storage-heavy builds; adds 30-50% more overhead volume |
| Hip | High | Good | Excellent | Coastal areas, hurricane zones, high-wind regions |
A standard 6:12 pitch (rising 6 inches for every 12 inches of horizontal run) is the most common spec in shed plans and balances snow shedding with material efficiency. Plans for southern states often specify a 4:12 pitch, which cuts lumber cost without meaningful snow-load risk. Most shed plan catalogs include gable roof designs as the default, which suits the majority of builders in continental US climates. Buying a gable plan for a Florida backyard shed isn’t wrong, but it’s paying for structural capacity you’ll never need.
Foundation Options: What Your Plans Need to Specify
Shed plans should specify the foundation type: concrete piers, pressure-treated skids, concrete slab, or a gravel pad with adjustable deck blocks. Each differs in cost, permanence, and permit implications. Plans that say “install on a suitable foundation” without specifying further leave a critical decision to the builder, which is exactly where mistakes happen on sloped or wet sites.
| Foundation Type | Cost Range | Permanence | Permit Impact | Best For |
|---|---|---|---|---|
| Gravel pad + deck blocks | $100 – $300 | Semi-permanent (relocatable) | Usually exempt from permits | Small sheds on level or near-level ground |
| Pressure-treated skids | $150 – $400 | Semi-permanent (can be moved) | Usually exempt from permits | 8×10 to 10×12 on mostly flat lots |
| Concrete piers | $200 – $600 | Permanent | Varies by jurisdiction | Uneven terrain, larger footprints, sloped yards |
| Concrete slab | $500 – $1,500 | Permanent | Often triggers permit requirement | Workshop sheds, heavy equipment storage |
Builders on r/shedditors — a community focused on shed construction and planning — consistently recommend pressure-treated skids for most 8-12 foot wide sheds on reasonably level ground. The skid method avoids concrete work, keeps the structure technically movable (which matters for permit exemption in many areas), and provides adequate ground clearance for ventilation and rodent prevention. The main caveat: on sites with more than a 6-inch grade change across the shed footprint, concrete piers are the safer choice.
Permits and Zoning: What to Check Before Finalizing Your Plans
Most US municipalities exempt accessory structures under 120-200 square feet from building permits, but setback rules apply regardless of permit status. A structure that avoids a permit can still be cited for violating a 5-foot side-yard setback. Check local zoning ordinances and HOA rules before selecting your plan, not after framing is up.
The main factors that trigger permit requirements in most US jurisdictions:
- Size threshold: 120 sq ft is the most common cutoff, though some counties use 144 or 200 sq ft
- Height: Structures over 10-12 feet typically require permits in most areas
- Setback distance: Most jurisdictions require 3-5 feet from property lines, permit or not
- Electrical or plumbing: Any utility connection elevates the structure to a “building” requiring a permit regardless of size
- Foundation type: A permanent concrete slab often triggers permit review even for small structures
“Thought I was permitting a shed, stumbled into an ADU?”
— r/shedditors, March 2026 (1,541 upvotes)
The thread behind this title details how a homeowner’s 16×20 shed project — which crossed the 320 sq ft threshold combined with a bathroom rough-in — was reclassified by the building department as an accessory dwelling unit (ADU), triggering entirely different permitting requirements, fees, and setback rules.
This aligns with guidance from the National Association of Home Builders (NAHB), which recommends contacting the local building department before purchasing plans to confirm size, height, and setback restrictions specific to your parcel.
An accessory dwelling unit (ADU) reclassification is one of the more expensive lessons in residential construction. A 30-minute call to the building department before ordering plans costs nothing. The reclassification paperwork, plan revisions, and additional fees that follow can run $2,000 to $8,000 depending on jurisdiction.
Frequently Asked Questions
Do I need a permit to build a storage shed?
Whether you need a permit depends on shed size, height, foundation type, and local zoning rules. Most US municipalities exempt sheds under 120 square feet from building permits, but setback rules (typically 3-5 feet from property lines) apply regardless. Always check with your local building or planning department before breaking ground.
What size shed can I build without a permit?
In most US jurisdictions, sheds under 120 square feet (roughly 10×12 or smaller) don’t require a building permit. Some counties use 144 or 200 square feet as the threshold. Adding electrical, plumbing, or a permanent concrete slab can trigger permit requirements even for smaller structures. Call your local building department for the exact limit in your area.
What is the cheapest foundation for a storage shed?
A gravel pad with pressure-treated skids or adjustable deck blocks is the least expensive foundation option, typically costing $150-$400 in materials for an 8×12 shed. It works well on level or near-level ground and keeps the structure technically relocatable, which helps with permit exemptions in many jurisdictions.
How do I read shed building plans if I have no construction background?
Start with the materials list and cut list before looking at any diagrams. These two sheets tell you what to buy and what lengths to cut. Once you have the physical materials in hand, the framing diagrams become much easier to follow. Most quality shed plans are designed specifically for DIY builders, so the diagrams use plain language and include measurement callouts at every critical joint.
Can I modify a free shed plan to change its dimensions?
Yes, but changing the footprint affects more than just wall length. Adjusting width or depth changes the cut list, rafter length, number of studs, and potentially the structural header sizes over doors and windows. If you’re comfortable with basic framing math, modifying an 8×10 plan to 8×12 is straightforward. Scaling up to a different structural category (say, 10×12 to 12×16) warrants using a purpose-built plan for that size rather than stretching a smaller design.
Putting It Together: Plan First, Build Second
Every storage shed build starts with the same sequence of decisions: choose the size based on what you actually need to store (then go one size up), select a roof style suited to your climate, match the foundation to your site conditions, and verify local permit thresholds before purchasing anything. A quality plan package that covers all six components — materials list, cut list, foundation spec, framing diagrams, roof details, and door schedule, makes every step that follows faster and cheaper.
The difference between a frustrating build and a straightforward one usually comes down to the quality of the plans, not the skill of the builder. Spend the extra time finding plans that include a complete cut list and foundation specification before you order a single board.