You’re tired of fighting your soil, aren’t you?
I know the feeling. I spent three summers amending my clay-heavy backyard in Portland, adding compost and peat moss until my back gave out. My tomatoes still looked sad by August. The weeds always won.
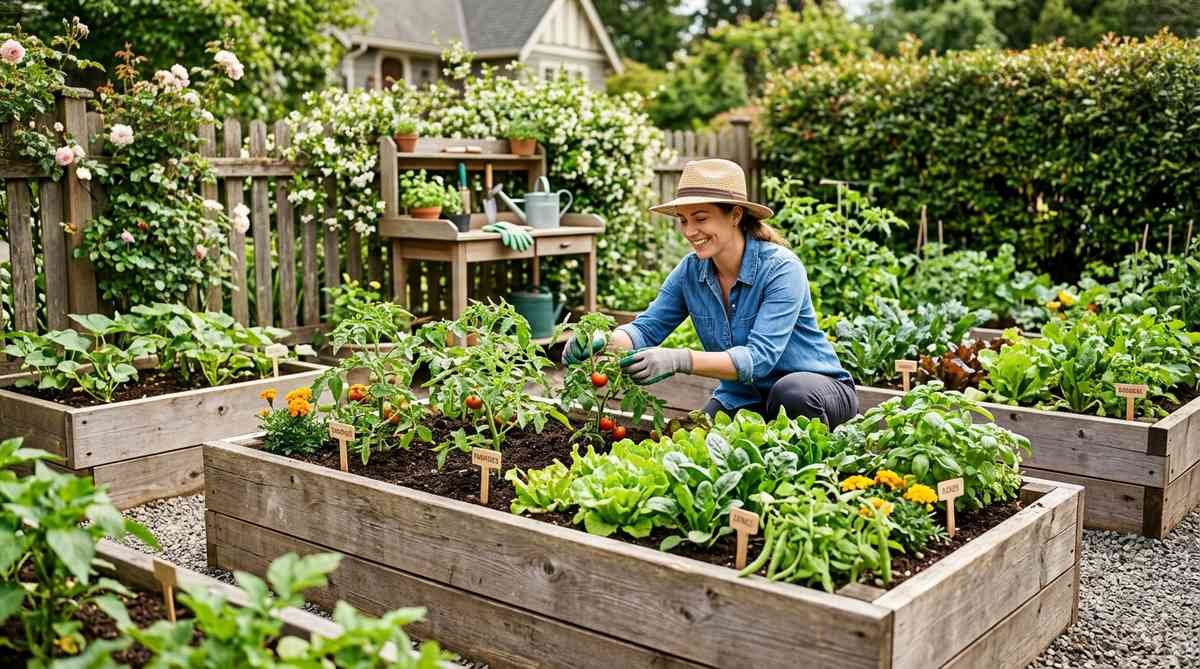
Then I built my first raised bed in 2018, and everything changed.
That first season, I harvested more lettuce, peppers, and herbs from one 4×8 cedar box than I’d ever gotten from my entire 200-square-foot in-ground plot. My neighbor walked over in July, looked at my overflowing tomato plants, and said, “What the hell happened here?”
Here’s the truth nobody tells beginners: raised bed gardening isn’t about building boxes — it’s about building a system that actually works.
In this guide, I’ll show you everything I learned building 5 raised beds over 8 years, including the mistakes that cost me hundreds of dollars and the shortcuts that actually work. By the end, you’ll know exactly which materials to buy, how much soil you really need, and how to set up your first bed this weekend — even if you’ve never built anything before.
Why Choose Raised Bed Gardening?
Let me start with the numbers from my own garden. My first raised bed (4×8 feet, 12 inches deep) produced:
- Year 1 (2018): 42 lbs of tomatoes, 18 lbs of peppers, continuous lettuce harvest May-October
- Harvest value: $340 worth of produce (based on organic grocery store prices)
- Initial investment: $175 (cedar lumber, soil mix, hardware cloth)
- Payback period: 7 months
By year two, that same bed had paid for itself twice over.
Here’s why raised beds work so damn well:
1. Your Soil Actually Drains
My backyard clay holds water like a swimming pool. After heavy rain, puddles sit for days. But my raised beds? They drain within hours.
According to Colorado State University Extension, raised beds can be planted 2-3 weeks earlier in spring because elevated soil warms faster and sheds excess water naturally. I plant lettuce in my raised beds on March 15. My neighbor with in-ground rows waits until April 1.
That’s an extra 16 days of growing season. Multiply that by spring and fall, and you’re adding 4-5 weeks of harvest per year.
2. You Actually Control the Soil Mix
With raised beds, you’re not stuck with whatever garbage soil came with your property. You fill the bed with exactly what plants need — no clay, no rocks, no construction debris someone buried in 1987.
Research by horticulturalist Mel Bartholomew found that raised bed gardens using square-foot planting methods produce up to 4 times more vegetables per square foot compared to traditional row gardening (Square Foot Gardening Foundation, 2015). That’s not marketing hype. That’s real.
3. Weeds Stop Being Your Full-Time Job
When you fill a raised bed with clean soil mix, you’re starting with zero weed seeds. The weeds that do show up come from wind-blown seeds, which are easy to hand-pull before they establish deep roots.
Last summer, I spent maybe 20 minutes per week on weed control across all five of my raised beds. My neighbor with in-ground rows? She’s out there 90 minutes twice a week. I’d rather be harvesting.
4. Your Back Doesn’t Hurt
I’m 38, and I already have lower back issues. Bending to ground level for an hour makes me useless the next day.
My newest bed sits at 24 inches high. I can sit on the edge and work comfortably for hours. My friend Rita, who uses a wheelchair, built hers at 30 inches. She gardens independently now — something that wasn’t possible with ground-level beds.
If you’re over 50, or if you have any mobility limitations, this alone makes raised beds worth it.
Who This Works Best For
Beginners dealing with terrible native soil: You’re bypassing the problem entirely. Don’t waste years amending clay or sand. Just build up.
Urban and small-space gardeners: A single 4×8 bed maxes out productivity in ways that sprawling row gardens never could. Perfect for backyards, side yards, even large patios.
Older adults or anyone with mobility issues: Beds at 24-36 inches eliminate bending. This isn’t a minor convenience — it’s life-changing for a lot of people.
Choosing Materials (What I Learned the Hard Way)
My first raised bed was built with untreated pine because it was cheap ($35 for lumber). It rotted out in 3 years. I had to rebuild it with cedar. Total waste of time and money.
Here’s what I should have done: spent $60 on cedar from the start. It’s still going strong 8 years later.
Let me break down the real pros and cons of each material — not from research papers, but from building with all of them.
Cedar and Redwood (What I Use Now)
My experience: I’ve built 3 beds with cedar. The oldest is 8 years old. It has some surface weathering, but structurally it’s perfect. No rot, no warping, no insect damage.
Cedar and redwood contain natural oils that resist moisture and fungal decay. They don’t need chemical treatment. According to Oregon State University Extension, properly built cedar raised beds last 10-20 years, even in wet climates. My Zone 6b Portland garden confirms this — we get 45 inches of rain per year, and my cedar beds aren’t even close to rotting.
Cost: $60-$120 for a 4×8 bed (depending on board thickness)
Best for: Anyone who wants a bed that lasts and looks good without maintenance.
My recommendation: This is what I’d build again. Every time.
Untreated Pine (My First Mistake)
I used untreated pine for my first bed because I was cheap. It lasted 3 years before the bottom boards started crumbling.
Pine is fine if:
- You’re testing raised beds for the first time
- You plan to upgrade in a few years anyway
- Your budget is truly tight
Cost: $15-$50 for a 4×8 bed
Lifespan: 3-5 years
Important: Never use pressure-treated lumber with CCA (chromated copper arsenate). Arsenic leaches into soil. Modern ACQ-treated lumber is considered safe by the EPA, but most extension programs still recommend untreated or naturally rot-resistant wood for food gardens. I don’t take chances with this.
Galvanized Metal (What Half My Forum Uses)
Metal corrugated steel beds are huge in the raised bed community. In a recent r/vegetablegardening thread about Vego metal beds, user u/missbwith2boys shared that their oldest Birdies metal beds are “maybe a decade plus years old” and still going strong in the Pacific Northwest — confirming the 20-year lifespan claims. Meanwhile, over in the Shed Town USA Forum, metal bed photos are some of the most popular posts.
Pros:
- Last 20+ years with zero maintenance
- Never rot, warp, or need paint
- Retain heat into the evening (good for cool-season crops in spring)
Cons:
- Metal can overheat roots in full sun during peak summer in hot climates. Gardeners in Arizona and Texas report this issue. The fix: line the inside edges with cardboard or straw mulch.
- More expensive upfront: $80-$250 for a kit
Zinc leaching question: This comes up constantly. Oregon State University Extension Service addressed it directly — zinc oxide on galvanized steel remains stable at normal soil pH levels (6.0-7.5). Powder-coated finishes add another barrier. Well-manufactured metal beds pose no risk to edible crops.
My take: If I were building new beds today, I’d seriously consider metal. The 20-year lifespan and zero maintenance appeal to me. As u/Working779 pointed out in that same r/vegetablegardening thread, if you go with metal, stick with US-based brands — “I was concerned about material contamination from Chinese sellers (I don’t want lead in my garden).” Good advice.
Recycled Plastic and Composite
I haven’t personally used plastic composite beds, but several gardeners in the Shed Town USA community and on r/vegetablegardening have. As u/ps030365 noted in a raised bed materials thread: “Depending on your capabilities, you can make your own metal raised beds. Metal roofing isn’t too expensive.” The same DIY spirit applies to composite — the consensus is they work great, last forever (20+ years), and solve the rot problem entirely.
Cost: $50-$150
Best for: Wet climates, eco-conscious gardeners who want recycled materials, and anyone who doesn’t want to think about maintenance.
Downside: They don’t look as good as cedar or metal. For front-yard gardens where aesthetics matter, that’s a consideration.
Quick Comparison (From Real Use)
| Material | Lifespan | Cost Range | My Recommendation |
|---|---|---|---|
| Cedar / Redwood | 10-20 years | $60-$120 (DIY) | Best overall choice |
| Untreated Pine | 3-5 years | $15-$50 (DIY) | Only if budget is very tight |
| Galvanized Metal | 20+ years | $80-$250 (kit) | Great long-term investment |
| Recycled Plastic | 20+ years | $50-$150 | Solid choice for wet climates |
How to Fill Your Raised Bed Without Going Broke
This is where most people blow their budget. A 4×8 bed at 12 inches deep needs 32 cubic feet of soil mix. If you buy bagged potting mix at $8-$12 per cubic foot, you’re looking at $250-$380 just for soil.
Here’s how I fill beds for $40-$80 instead.
The Soil Mix I Actually Use
I’ve tried three different mixes. The one I use now:
60% topsoil / 30% compost / 10% coarse sand
Why this works:
- The topsoil provides structure and bulk (cheap)
- The compost feeds soil biology and adds nutrients
- The sand keeps the mix from compacting into a dense slab over time
I buy this in bulk from a local landscape supplier. One cubic yard delivered costs $45. That’s enough for 1.2 beds.
Mel’s Mix (from Square Foot Gardening) is another option: equal thirds of compost, peat moss (or coco coir), and coarse vermiculite. It’s lighter and more moisture-retentive. Some people swear by it. I found it expensive and unnecessary for my climate.
According to University of Minnesota Extension, raised bed soil should drain freely while retaining enough moisture to stay workable — a balance native soils rarely achieve. Both mixes above accomplish this.
How Much Soil You Actually Need
Use this formula:
Length (ft) x Width (ft) x Depth (ft) / 27 = cubic yards
| Bed Size | Depth | Cubic Feet Needed | Cubic Yards |
|---|---|---|---|
| 4 x 4 ft | 12″ | 16 cu ft | 0.59 cu yd |
| 4 x 8 ft | 12″ | 32 cu ft | 1.19 cu yd |
| 4 x 12 ft | 12″ | 48 cu ft | 1.78 cu yd |
Pro tip from the raised bed community: For beds deeper than 12 inches, fill the bottom third with logs, wood chips, or straw. This is called Hugelkultur. It cuts your purchased soil volume by 30%, and the organic material breaks down over time, generating heat and nutrients. I did this with my deepest bed (18 inches), and it worked great.
A word of caution from Reddit: In a recent r/gardening thread, a Zone 7a/b desert gardener asked about using Hugelkultur in raised beds. User u/RobfromHB warned: “I would not do this for your area if high temps during summer are the issue. That mix will by definition cause more water stress than planting in the ground.” Fellow desert gardener u/mitsymalone added: “You might look into sunken beds rather than Hugelkultur. Raised beds lose moisture more quickly than sunken beds.” If you’re in an arid climate, keep this in mind — Hugelkultur works best in areas with regular rainfall.
Where to Actually Buy Soil (This Saves You Hundreds)
Don’t: Buy bags at Home Depot. You’ll spend $250+ filling one bed.
Do: Call local landscape suppliers. Ask for “raised bed soil mix” or “garden mix.” Get it delivered in bulk.
- My supplier (Portland area): $45/cubic yard delivered
- Fills: 1.2 standard beds (4×8 at 12″ deep)
- Savings vs. bagged: About $180 per bed
Search “landscape supply [your city]” or “bulk garden soil [your city].” Most suppliers deliver for a $30-$50 fee, which is still way cheaper than bags.
Pest Control That Actually Works
Raised beds reduce pest pressure, but they don’t eliminate it. Here’s what works based on 8 years of trial and error.
Gophers, Voles, and Moles (The Worst Problem)
These burrowing bastards destroyed my first bed before I learned to use hardware cloth.
The fix: Line the bottom of every bed with 1/2-inch galvanized hardware cloth before filling with soil.
I learned this the hard way. My first bed had no liner. In year two, something ate the roots of 8 tomato plants from underground. I dug down and found tunnels everywhere. Had to rebuild the entire bed.
Now I line every bed before filling. Zero damage in 6 years since.
Cost: $15-$25 per bed
Where to buy: Hardware stores carry rolls. You want 1/2-inch mesh (not chicken wire — voles squeeze through that).
Installation: Cut to size, overlap edges by 6 inches, staple to the inside of the bed frame before filling.
The raised bed community is basically unanimous on this point. In a popular r/gardening thread about cedar bed placement, the top comment says it all:
“Put gopher wire beneath the beds.”
— u/TopRamenisha, r/gardening, 2024 (650 upvotes)
Multiple comments echoed this, with u/AcanthisittaNo6653 adding: “Consider putting some gopher grate underneath to keep the critters out.” If there’s one universal lesson from the raised bed community, it’s this: always line the bottom.
Slugs and Snails
Slugs love my Pacific Northwest garden. They’ll eat entire seedlings overnight if I don’t control them.
What works:
- Copper tape: I run self-adhesive copper tape around the top edge of wooden beds. Slugs get a mild electrical shock on contact and turn back. This actually works — I’ve watched them approach, touch the tape, and retreat.
- Diatomaceous earth: Sprinkle around the base of plants. The sharp particles cut soft slug bodies. Reapply after rain.
- Beer traps: For heavy infestations, bury shallow containers filled with cheap beer. Slugs crawl in and drown. I empty these every 3 days during peak season.
Aphids, Cabbage Worms, Flea Beetles
Row cover fabric solves most insect problems. I drape it over simple wire hoops (made from 9-gauge wire) immediately after planting.
The fabric blocks egg-laying adults while still allowing light, air, and water through. I use Agribon AG-19. It’s reusable for 3-4 seasons.
Remove covers when plants need pollination (tomatoes, peppers, squash).
Soil-Borne Diseases
Starting with clean purchased soil eliminates most soil-borne pathogens that plague in-ground gardens. Maintain that advantage with crop rotation.
Simple rule: Don’t plant the same family in the same bed two years in a row.
- Nightshades: Tomatoes, peppers, eggplant
- Brassicas: Broccoli, cabbage, kale
- Cucurbits: Cucumbers, squash, melons
I rotate beds on a 3-year cycle. This keeps fungal diseases like verticillium wilt and fusarium from building up.
Also: Top-dress with 1-2 inches of fresh compost every spring. Healthy soil biology actively suppresses pathogenic fungi and bacteria.
Extending Your Season (4 Extra Weeks of Harvest)
Raised beds warm up faster in spring and stay warmer into fall. You can push this advantage even further with simple season-extension techniques.
Cold Frames (What I Use in Spring)
A cold frame is a bottomless box with a transparent lid. Place it over a bed in early March, and soil temperatures inside climb 10-20 degrees F above ambient.
I built mine from scrap lumber and an old window. Cost: $0. (You can also buy ready-made cold frames for $40-$150.)
What I grow in cold frames:
- Lettuce (starts February 20 in my Zone 6b garden)
- Spinach (germinates when soil is still 40 degrees F)
- Radishes (harvest in 25 days even in early spring)
- Peas (planted March 1, harvesting by May 15)
Open the lid on warm days (above 55 degrees F) to prevent overheating. I prop mine open with a stick when I leave for work.
PVC Hoop Houses
For longer beds, PVC hoops covered with 6-mil greenhouse plastic work great.
Cost: $20-$40 for a 4×8 bed
Assembly time: 1 hour
I’ve seen dozens of DIY hoop house builds in r/vegetablegardening. Most use 1/2-inch PVC pipe bent into arches and anchored with rebar stakes.
Fall and Winter Gardening
In late August, when summer crops start declining, I pull spent plants and immediately sow fall crops in the same space.
What I plant in September:
- Kale (handles frost down to 20 degrees F)
- Garlic (plant cloves in fall, harvest July)
- Spinach (overwinters with mulch protection)
- Carrots (actually sweeter after frost)
Mulch for winter protection: I cover fall beds with 4-6 inches of straw mulch in November. This insulates soil through hard freezes and protects overwintering crops.
With this setup, I harvest greens through December and start again in February. That’s 10-11 months of production instead of the typical 6-month season.
Real Budget Breakdown (What It Actually Cost Me)
Here’s the honest breakdown for my most recent bed (built 2024):
4×8 Cedar Bed – DIY Build
| Item | Cost | Notes |
|---|---|---|
| Cedar 2×12 boards (3) | $75 | Two 8-ft, one 4-ft |
| Galvanized deck screws | $8 | 3-inch screws |
| Hardware cloth (4×8 ft) | $22 | 1/2-inch mesh |
| Staples for cloth | $5 | Heavy-duty |
| Subtotal (Frame) | $110 | |
| Bulk garden mix (1.5 cu yd) | $68 | Delivered |
| Compost top-dressing | $12 | 2 bags |
| Subtotal (Soil) | $80 | |
| Seedlings (tomatoes, peppers, herbs) | $24 | Local nursery |
| Drip irrigation kit | $28 | 50-ft soaker hose + timer |
| Row cover fabric + hoops | $18 | Reusable |
| Subtotal (Planting) | $70 | |
| TOTAL | $260 |
First-year harvest value (based on organic grocery prices):
- 38 lbs tomatoes: $152
- 14 lbs peppers: $56
- Continuous herbs (basil, cilantro, parsley): $80
- Lettuce and greens: $65
- Total: $353
Payback: 8 months
By year two, this bed has paid for itself and will keep producing for 10-15 years.
FAQ from Real Gardeners
These are the questions I get most often in the Shed Town USA Forum and from neighbors who visit my garden.
How deep should a raised bed be for vegetables?
Minimum 6 inches for shallow-rooted crops like lettuce, herbs, radishes, and spinach.
12 inches for tomatoes, peppers, carrots, and most root vegetables. This is what I build.
Going deeper than 18 inches rarely improves yields for standard vegetable gardens. You’re just adding cost without benefit. Save your money.
Exception: If you’re building at waist height for accessibility (24-36 inches), fill the bottom third with logs or wood chips to reduce soil costs.
Do raised beds need a bottom?
No. Bottomless beds placed directly on the ground allow earthworms to enter and roots to extend below the frame.
Always line the bottom with hardware cloth to block gophers and voles, but don’t seal it with wood or plastic. That blocks drainage and suffocates beneficial organisms.
If you’re placing beds on concrete or a deck, drill drainage holes and increase bed depth to at least 12 inches.
What’s the best size for a raised garden bed?
4 feet wide is the standard maximum. You can comfortably reach the center from either side without stepping into the bed.
Length is flexible. I like 8 feet because it’s easy to source lumber in 8-ft lengths. Some people do 12 feet. It doesn’t matter much.
Height depends on your body:
- 12 inches: Standard for most people
- 24 inches: Reduces bending significantly
- 30-36 inches: Wheelchair-accessible (keep width at 24 inches or less for reach)
Can I use raised beds in a small yard or on a patio?
Absolutely. A 2×4-foot bed fits on most patios and produces a surprising amount of herbs, salad greens, and compact vegetables.
I’ve seen people on r/containergardening growing full salad gardens in 3×3 beds on apartment balconies.
Self-watering raised planters designed for decks typically include built-in water reservoirs that reduce watering frequency to every few days.
How often should I water raised beds?
Raised beds dry out faster than in-ground plots because they drain efficiently.
During summer: Most vegetable gardens in raised beds need watering every 1-2 days.
My setup: Drip irrigation on a timer. It delivers water directly to the root zone, reduces evaporation, and keeps foliage dry (which helps prevent fungal disease).
I water daily in July and August (my hottest months). Every other day in May, June, and September.
Do I need to replace the soil in raised beds?
No. Full replacement is rarely necessary.
What I do: Top-dress each spring with 1-2 inches of compost. This replenishes nutrients and restores volume lost to decomposition and settling.
After 5-7 years, if drainage slows noticeably or yields drop despite regular composting, consider refreshing the top 6 inches. I haven’t needed to do this yet (8 years in).
What mistakes do beginners make?
Based on watching dozens of first-timers in my neighborhood and online:
- Buying too much soil (overestimating cubic yards needed)
- Skipping hardware cloth (losing plants to underground pests)
- Building beds too wide (can’t reach the middle without stepping in)
- Using pressure-treated lumber (unnecessary and potentially risky)
- Not planning for irrigation (hand-watering every day gets old fast)
Join the Raised Bed Gardening Community
You don’t have to figure this out alone. Some of the best raised bed advice comes from real people sharing real results — and real failures. Here’s where I go when I have questions:
Shed Town USA Forum – Gardening Section (2,400+ members)
This is where I met most of my local gardening friends. Active threads on everything from gopher control to winter crop planning. Post photos of your build and get feedback before you start.
r/vegetablegardening on Reddit (650,000+ members)
This subreddit is a goldmine for raised bed discussions. Recent highlights include a Vego metal bed comparison thread where gardeners compared Birdies, Vego, and cheap Amazon alternatives, and a popular thread from a beginner who accidentally used the wrong Miracle-Gro soil mix — the community helped them fix it by adding topsoil and compost layers.
r/gardening on Reddit (7 million+ members)
The general gardening community with a huge raised bed following. One of the most popular raised bed posts ever (8,000+ upvotes) was a COVID-era victory garden build with eleven 10×4 raised beds. Another viral post (640+ upvotes) sparked a massive debate about whether to place cedar beds directly on the ground or on stone — the top comment (650 upvotes) from u/TopRamenisha recommended “put gopher wire beneath the beds, but otherwise place them on the bare ground.”
r/Raisedbed and r/GardenBedGardening
Smaller, focused communities specifically for raised bed gardeners. Great for kit reviews and build advice.
Your local extension office:
Google “[your state] extension service gardening.” They offer free soil testing, region-specific planting calendars, and expert advice. I email Oregon State Extension at least 3-4 times per year.
Start with One Bed. Just One.
That’s how everyone starts. In a viral r/gardening post (2,979 upvotes), one beginner built their first raised bed from random bricks and junk wood found in the garden. The community loved it:
“That’s pretty neat. I love reusing materials.”
— u/Optimassacre, r/gardening, 2023 (678 upvotes)
Another user suggested lining it with cardboard and filling the bottom with branches — the Hugelkultur method I mentioned earlier. The point is: you don’t need perfection to start. Build a single 4×8-foot bed, fill it with good soil, plant something you actually want to eat, and see what happens.
Most people discover they love it. By next spring, they’re building three more — not because they have to, but because the results make the work feel worth it.
What worked for me:
- Cedar frame (still perfect after 8 years)
- 60/30/10 soil mix from bulk supplier
- Hardware cloth liner (zero pest damage)
- Drip irrigation on a timer
- Cold frame for spring planting
My first-year mistakes:
- Built one bed with untreated pine (rotted in 3 years)
- Forgot hardware cloth on one bed (gophers destroyed it)
- Bought bagged soil once (wasted $180)
Learn from my screw-ups. Build with cedar or metal. Line with hardware cloth. Buy soil in bulk. Set up irrigation early.
Have questions? Drop a comment below. I read every comment and reply within 24 hours.
Ready to build? Join the discussion in the Shed Town USA Forum to share your plans and get feedback from 2,400+ experienced gardeners.
Need storage for your tools and supplies? Check out our Garden Shed Collection — purpose-built storage designed for raised bed gardeners.
RankMath SEO Meta (Copy & Paste)
SEO Title: Raised Bed Gardening Guide (2026): Build Your First Bed This Weekend
SEO Description: Master Gardener shares 8 years of raised bed experience. Materials, soil mix, pest control, budget breakdowns, and real harvest data from 5 beds.
Focus Keyword: raised bed gardening
